April 24, 2025• 13 min read
App Store Optimization (ASO) Guide & Checklist for iOS
Written by: Grant Oganyan
- App Store Optimization (ASO) Guide & Checklist for iOS
- What is App Store Optimization (ASO)
- Why you need to do ASO
- 1. Optimize your app’s title with keywords
- 2. Communicate app’s purpose with the subtitle
- 3. Optimize the keywords field
- 4. Write a thorough description of your app
- 5. Tell a story in your “What’s new” section
- 6. Optimize your screenshots for a good first impression
- 7. Create In-App Events with each large update
- 8. Reply to reviews
- 9. A/B test your creatives
- 10. Create custom product pages for different audiences
- ASO Checklist
Learn how to boost your app's visibility with this complete iOS ASO guide and checklist. We will cover titles, keywords, screenshots, reviews, and more.
You just launched your app, but now it’s time to promote it - and that starts with getting discovered on the App Store. With millions of apps competing for attention, App Store Optimization (ASO) is your secret weapon to increase visibility, attract the right users, and drive downloads.
In this guide, we’ll walk you through the key ASO strategies specifically for iOS, from choosing the right keywords to creating eye-catching screenshots—plus a handy checklist to make sure you’ve covered it all. Let’s dive in and help your app stand out in a crowded store.
What is App Store Optimization (ASO)
💡 App Store Optimization (ASO) is the process of improving your app’s visibility in the app store search results and increasing conversion rates to drive more downloads.
Think of ASO as SEO (search engine optimization) for mobile apps. When someone searches for an app like yours in the App Store, ASO determines how high your app appears in the results, and how convincing your listing is once they land on it.
It involves optimizing several elements of your app’s product page, like the title, keywords, description, and visuals, to make sure your app not only ranks well but also attracts and converts the right audience.
Apple’s algorithm looks at relevance, tap-through rates, and downloads, so ASO is both about showing up and standing out.
Effective ASO isn’t a one-time task - it’s an ongoing strategy. As trends change, competitors evolve, and your app gets updated, your ASO should evolve too. Regular testing, keyword updates, and creative refreshes are all part of staying ahead.
Why you need to do ASO
If you want your app to succeed, App Store Optimization (ASO) isn’t optional—it’s essential. With around 2 million apps on the App Store, most users won’t scroll far to find what they need.
A large percentage of downloads come directly from App Store searches, which means if your app doesn’t rank well for relevant keywords, you’re missing out on a massive share of organic traffic.
💡 ASO helps your app appear in more search results, increasing its visibility and driving high-intent users to your product page.
But visibility is only half the equation: ASO also boosts conversions. A well-optimized app listing helps users immediately understand what your app does, why it’s valuable, and why they should download it.
With compelling visuals, a clear description, and a focused message, you can turn curious browsers into loyal users. Plus, effective ASO lowers your user acquisition costs by increasing organic installs, so you can grow sustainably without relying solely on paid ads.
Simply put, ASO helps your app reach the right people, and convinces them to hit that download button.
1. Optimize your app’s title with keywords

Your app’s title is the most important piece of real estate in ASO. Apple gives you just 30 characters, so every word must count.
💡 A good title should clearly communicate your app’s purpose while including high-value keywords that users are likely to search for.
When choosing keywords for your title, start with the core feature or category your app belongs to. Think about what users would type when looking for a solution like yours. For example, if you’ve built a to-do list app, the phrase “to-do list” or “task manager” should absolutely be in your title.
✅ Good title examples:
TaskFlow: To-Do List & Planner
FocusTask – Daily Task Manager
QuickList: Simple To-Do Tasks
🚫 Bad title examples:
TaskFlow
FocusTask - your best app
QuickList: become more efficient
2. Communicate app’s purpose with the subtitle
The subtitle is the second most important field in your App Store listing. So, just like the title, it plays a major role in how Apple ranks your app in search results.
The subtitle is your chance to reinforce your app’s core value, add supporting keywords, and give users a quick snapshot of what your app actually does.
To optimize your subtitle, include secondary or supporting keywords that didn’t fit into your main title. Think about features, benefits, or user intent
💡 Avoid repeating the same keywords from your title - Apple’s algorithm doesn’t count duplicates.
Using our fictional to-do list app, here are some examples of good and bad subtitles:
✅ Good subtitle examples:
Organize tasks & stay focused
Daily planner for work & life
Simple calendar and reminders
3. Optimize the keywords field
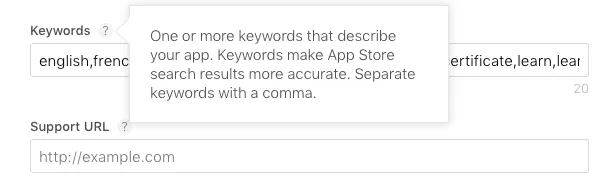
The keywords field in your App Store listing is crucial for getting your app discovered, but it works a little differently than the visible title or subtitle. This metadata is hidden from users but is still scanned by Apple’s algorithm to determine where your app appears in search results.
You have a total of 100 characters, so it’s essential to use this space wisely. Focus on relevant, high-traffic keywords that describe your app’s features, benefits, and use cases. To find the best ones, use ASO tools like AppTweak, Sensor Tower, or App Radar.
Look for keywords with high search volume and low competition - these offer the best chance for ranking well without being crowded out by top apps.
Here are some best practices for optimizing your keywords field:
Use all 100 characters if possible. Every character is valuable.
Separate keywords with commas and leave no spaces. For example: reminder,tasks,planner,calendar
Don’t repeat words already used in your title or subtitle - Apple only counts each keyword once.
Skip both singular and plural versions (e.g., don’t use task,tasks) - Apple automatically considers both.
Avoid stop words like "and", "the", "for", etc. - they don't help with ranking.
4. Write a thorough description of your app
Your app's description is one of the most important elements for convincing users to hit that download button.
💡 The description is not indexed by Apple’s search algorithm, so it doesn't directly affect your rankings.
Description is your pitch for potential users to understand exactly what your app does and why they need it. It’s your chance to communicate the full value of your app and create excitement.
Start with a concise, attention-grabbing introduction that sums up your app in one sentence.
Then, go into detail about how the app works and why it’s the perfect solution for your users’ needs.
Make a list of key features and benefits, focusing on what makes your app stand out from the competition.
If you're looking for help crafting the perfect app description, try our free description tool. It guides you through the key elements of your app’s overview and generates a solid first draft. With a little polish, you'll have a compelling, user-friendly description ready to go.
5. Tell a story in your “What’s new” section
The “What’s New” section of your app is often overlooked, but it’s an incredibly valuable opportunity to connect with users and show that your app is actively being improved.
Many users check this section before downloading the app to see the developer’s tone and culture. Rather than just listing changes, take the opportunity to tell a story about what’s new.
Share the problem your new features solve, how the update improves the user experience, and why it matters. This personal touch helps build trust and shows that you’re committed to continuous improvement.
Keep the tone friendly and conversational
Write in full sentences, rather than short lists
Ask for feedback at the end
Provide a quick way to contact you, either with an email or social media tags
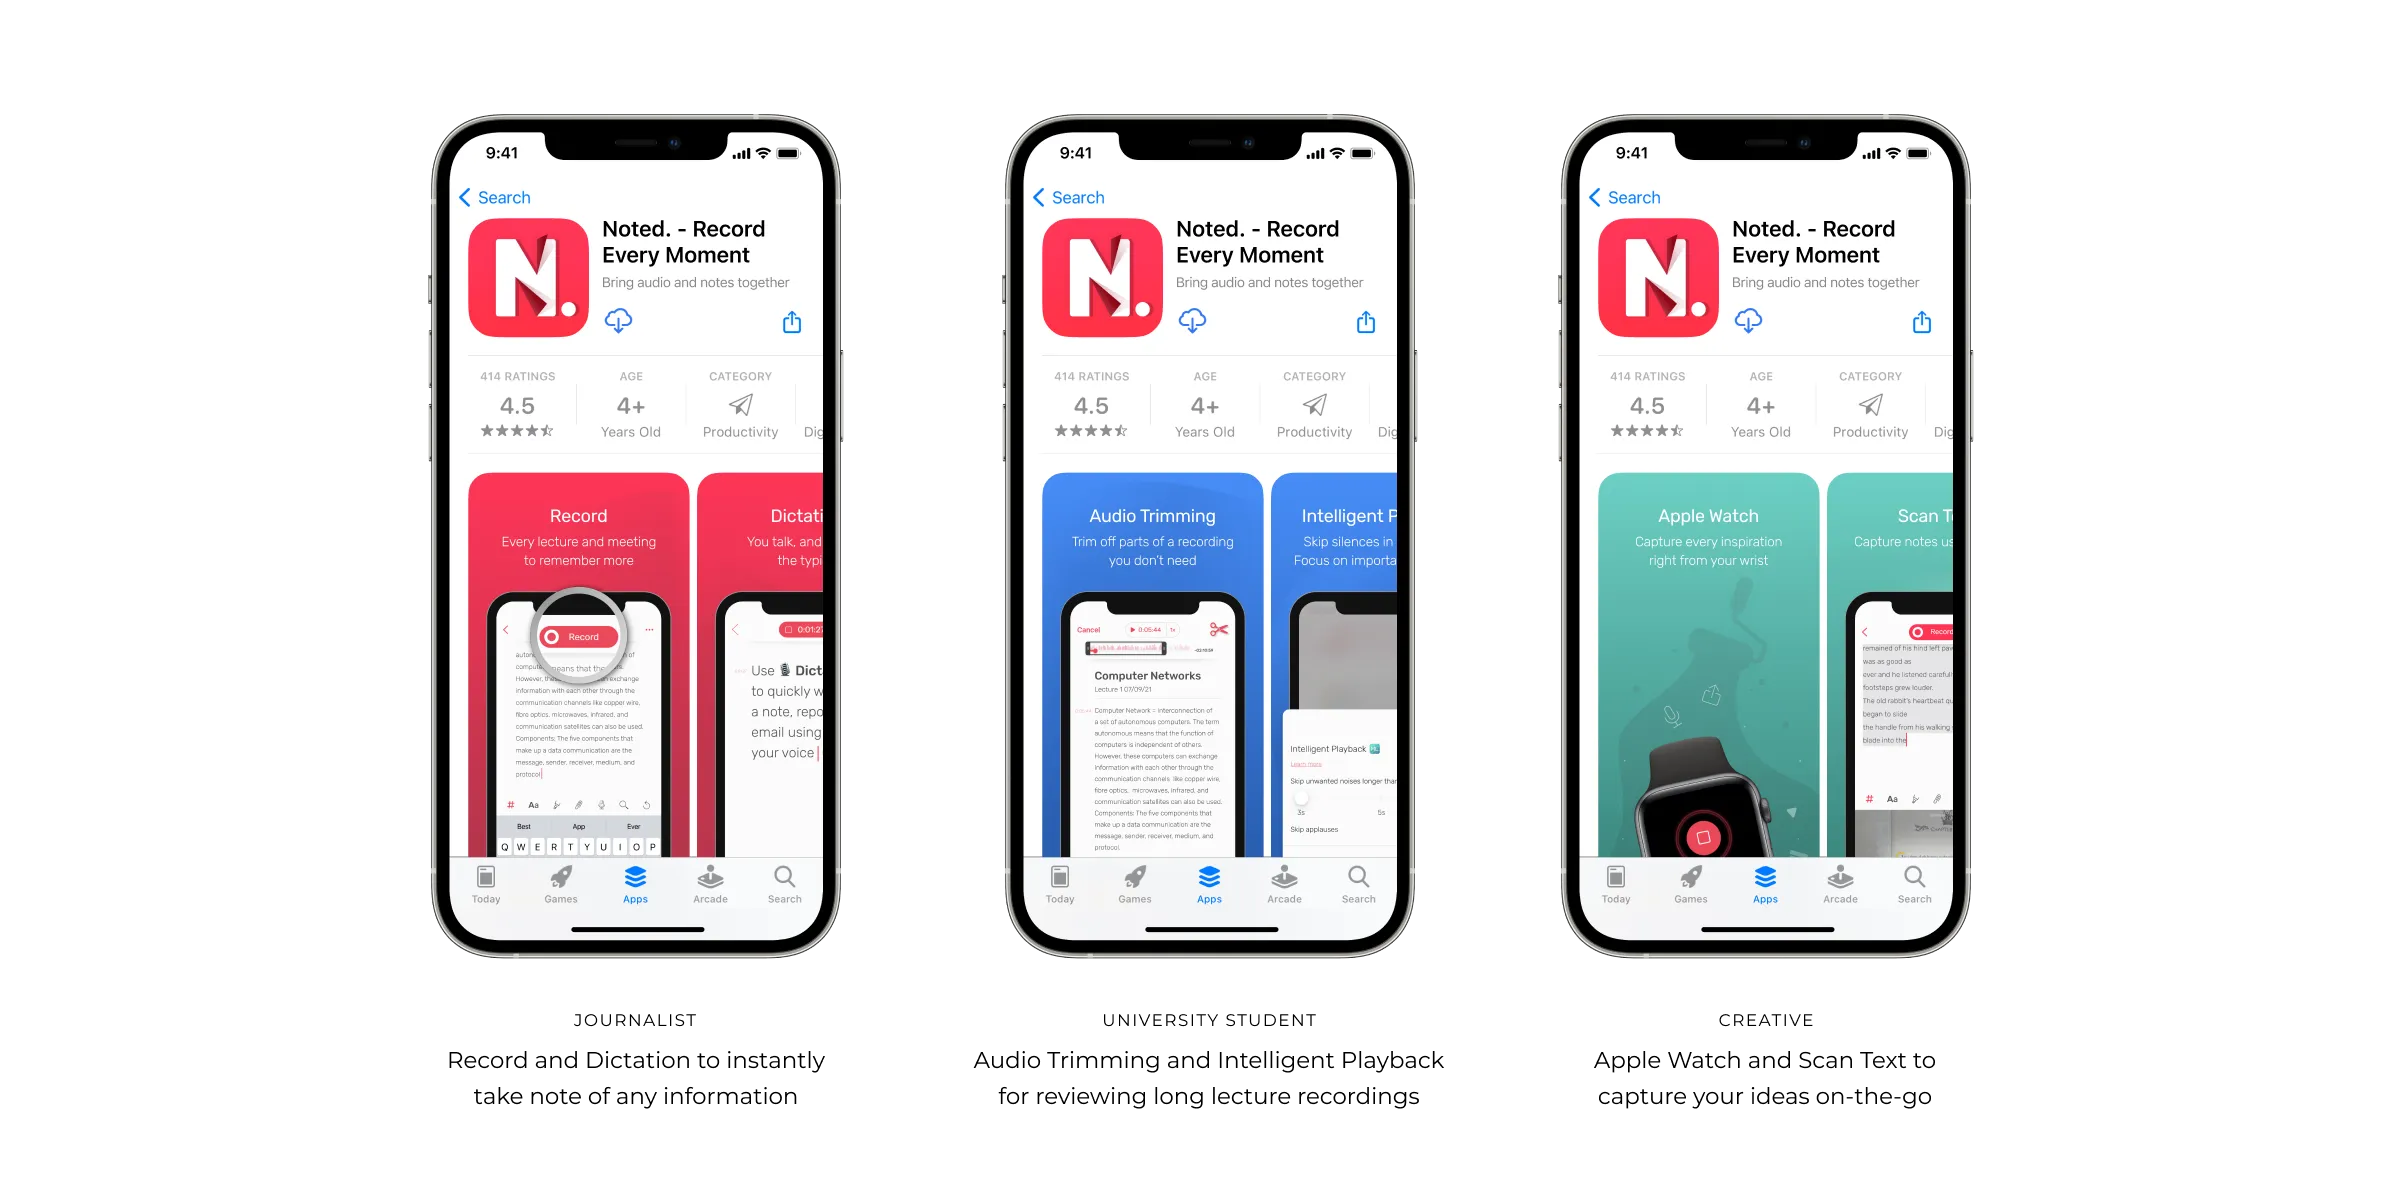
6. Optimize your screenshots for a good first impression
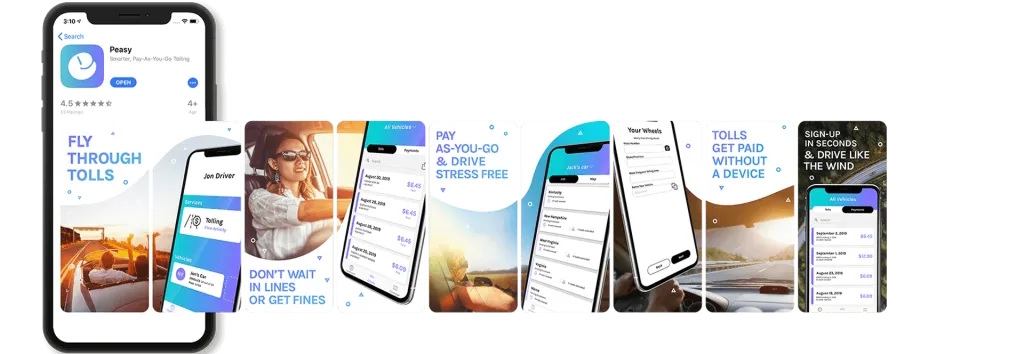
Screenshots are often the deciding factor for users when choosing whether or not to download an app. Since they offer a visual preview of what your app looks like in action, it’s important that they not only highlight your app’s features but also look polished and visually appealing.
💡 To leave a lasting impression, make your screenshots follow visually from one to the next, having a few graphical elements overlap between each screenshot. This creates a cohesive narrative that encourages users to scroll through the entire set.
Make sure your screenshots are high-quality, free from clutter, and clearly show the most important aspects of your app.
Your screenshots should give users a glimpse of the experience they can expect. Use captions or text overlays to explain key features if needed, but keep it simple and focused.
💡 The first three screenshots are critical since they appear in search results. These need to be your most eye-catching images, grabbing users’ attention to encourage them to tap and learn more about your app.
7. Create In-App Events with each large update
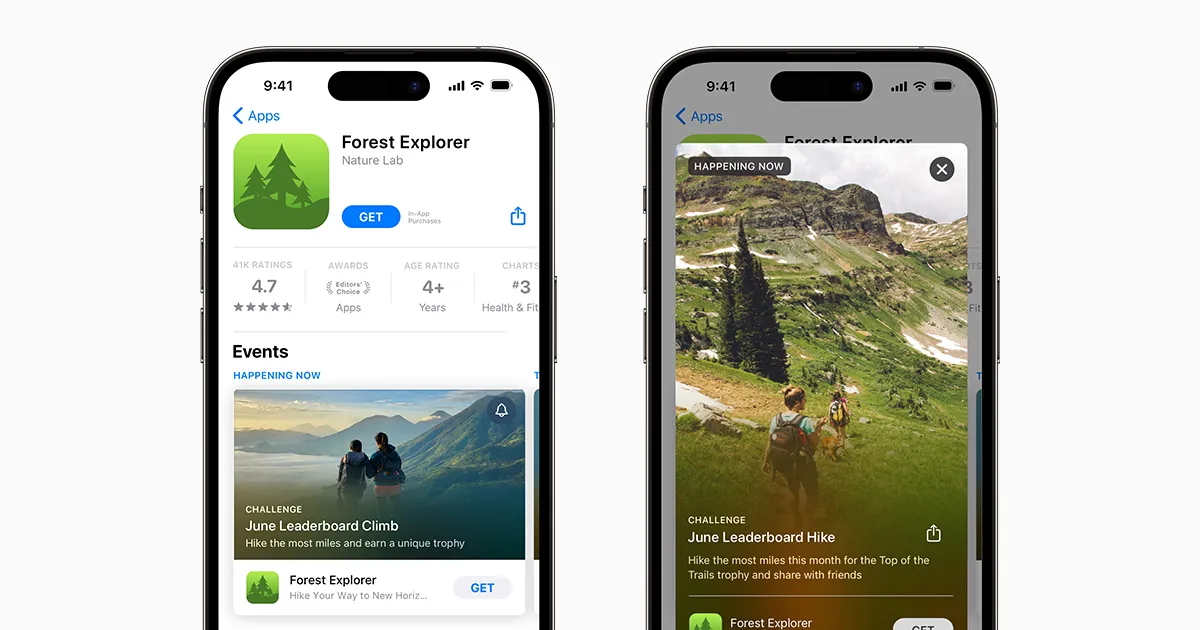
In-App Events are a powerful way to boost visibility and engagement in the App Store. These events show up in search results, on your app’s product page, and in editorial sections, meaning they can help you reach users beyond your existing base.
Every time you launch a major update, you should consider pairing it with a custom in-app event to highlight what’s new. Whether it’s a feature release, seasonal content, or a limited-time challenge, in-app events signal to users (and Apple) that your app is actively evolving.
Craft a clear and compelling message about what the event is and why users should care.
Use the space to promote your newest features and improvements, and
Create eye-catching graphics that reflect your app’s brand identity.
With each big release, an in-app event can act as a mini marketing campaign: drawing users in, re-engaging existing ones, and improving your overall App Store presence.
8. Reply to reviews
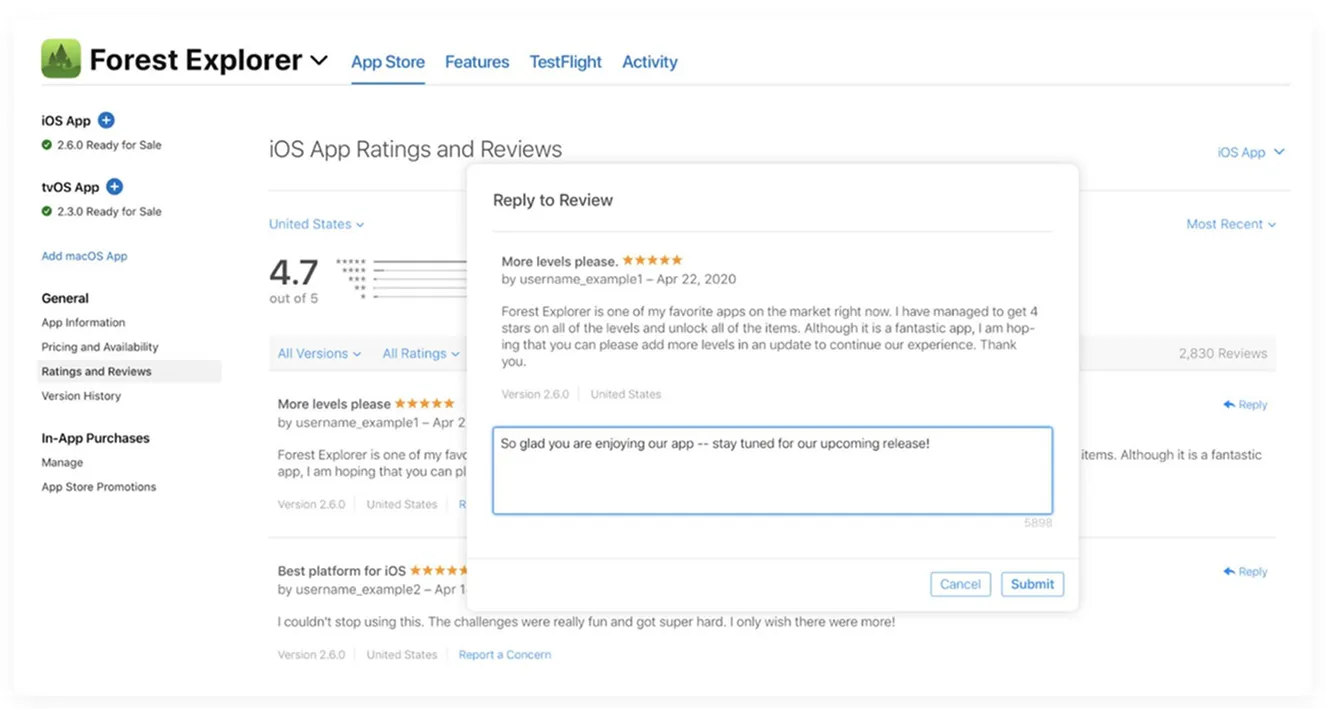
Replying to reviews is an essential part of building trust with your user base and showing that you're an engaged, responsive developer. When users see that you take the time to interact with feedback (both positive and negative) it sends a strong message that you care about their experience.
Apple highlights developer responses in the App Store, which means your replies can influence potential users who are reading through the reviews to decide whether or not to download your app.
🟢 For positive reviews: thank users for their warm words and support to build loyalty.
🔴 For negative reviews: stay constructive, apologize for any issues, and offer solutions or a way to reach you directly for help.
A thoughtful reply can turn a frustrated user into a loyal one - and shows prospective users that you're committed to improving the app.
9. A/B test your creatives
A/B testing your creatives is one of the smartest ways to improve your App Store performance over time. Apple’s Product Page Optimization feature allows you to test different versions of your app’s screenshots, preview videos, and icons to see which combinations lead to more installs.
✅ Create multiple versions of your product page (different icons, screenshots, or videos)
🧪 Set up a test using Apple’s Product Page Optimization in App Store Connect
📊 Run the test and let it collect enough data over time
🔍 Analyze the results to see which version drives more conversions
🏆 Publish the winner to boost installs and overall performance
🔁 Repeat regularly to keep improving and stay aligned with trends
This data-driven approach takes the guesswork out of design, helping you understand exactly what appeals to your audience and what doesn't. Even small tweaks to your visuals can lead to meaningful increases in conversion rates.
💡 By running A/B tests regularly, you can continuously refine your app’s presentation to better match user expectations and trends.
10. Create custom product pages for different audiences
Custom Product Pages allow you to tailor different versions of your App Store listing for specific audiences or marketing campaigns. Instead of using a single, generic page for everyone, you can create up to 35 unique product pages—each with its own set of screenshots, promotional text, and preview videos.
This means you can highlight different features, use targeted messaging, or even adjust visuals based on where your traffic is coming from. For example, if you're running ads focused on productivity, your custom page can showcase your app’s calendar and planning tools front and center.
This approach is especially powerful when used with paid campaigns, influencer promotions, or different user segments. By matching the content of the product page to the intent of the user, you're more likely to improve your conversion rates and reduce drop-off.
ASO Checklist
Here’s your ultimate App Store Optimization (ASO) checklist — use this to make sure every part of your app listing is working hard to attract and convert users.
📝 App Metadata
Use a clear, keyword-rich App Title (max 30 characters)
Write a concise, descriptive Subtitle with secondary keywords (max 30 characters)
Fill the Keywords Field (max 100 characters, comma-separated, no spaces)
Avoid repeating keywords from your title and subtitle
Research keywords with ASO tools like AppTweak, Sensor Tower, or App Radar
📄 App Description
Start with a strong one-sentence app summary
Describe key features and benefits clearly
Use bullet points or short paragraphs for easy scanning
🆕 What’s New Section
Write in full sentences with a friendly tone
Highlight new features and bug fixes
Invite feedback and share contact info
🖼️ Visual Assets
Create high-quality, branded Screenshots
Make the first 3 screenshots attention-grabbing (they appear in search results)
Maintain visual consistency across all screenshots
Add captions or overlays to explain features
Include an App Preview video
📅 In-App Events
Create an In-App Event for every major update
Design eye-catching event graphics
Use events to showcase new features or limited-time content
💬 Reviews & Ratings
Reply to positive reviews with gratitude
Respond to negative reviews with empathy and solutions
Include support contact information in replies
🧪 A/B Testing
Use Apple’s Product Page Optimization to test icons, screenshots, and videos
Track conversion rates and pick the top-performing creatives
Run new tests regularly to keep improving
🧩 Custom Product Pages
Create tailored pages for different audiences or campaigns
Match visuals and messaging to user intent
Use these with targeted ads or influencer promotions
Use this checklist as your go-to ASO playbook—check it regularly, especially before launching updates or marketing campaigns. Solid ASO isn’t a one-time task - it’s an ongoing process that helps your app stay visible, relevant, and competitive in the App Store.
Create an online press kit
Make it easier for anyone to learn about your product with Pressdeck